Related Posts Widget for Blogs by LinkWithin

Monday, January 30, 2006

Quilts--Inspired by Amy Karol


Bird with Nest Quilt
Originally uploaded by Green Kitchen.
One of a series of small quilts I did for holiday gifts, inspired by Amy Karol at kingpod. At first I was hesitant to post these online because I felt that maybe I would be infringing on Amy's craft territory, but after reading Eireann's plagiarism post and related comments I thought it would be OK. My thinking is, that if we are inspired by other artists and crafters, it's a great compliment to be copied--as long as it is done with sensitivity and awareness. A nod to the original source is requisite, links to sites a must. Let's not let a few idea-stealers ruin the beauty of the generosity amongst this amazingly talented pool of artists, illustrators, photographers, painters, sewers, spinners, felters, crocheters, knitters, jewelers, cooks, and writers. The sharing is a large part of the beauty of this online community.

More quilt photos here and here.

See more of Amy at Whip Up where she'll be contributing to Kathreen of Red Current's new multi-author craft site. Watch for the first installment to be whipped up on Feb. 1st, tomorrow!

Labels: , ,

Saturday, January 28, 2006

Vintage Lady Hanger Tutorial


Vintage Lady Hanger
Originally uploaded by Green Kitchen.
This silent movie star hanger was my favorite holiday project that I made last year. It was inspired by a vintage hanger that my friend, Sundee, used to have when we were housemates. Her hanger lady was dark, moody and had a beautiful sixty-year patina. We hung her on the wall and she looked lovely. Somewhere along the way, after several cross-Atlantic movings, the original hanger lady got lost. I'll try to find a photo of her to post later.

One of the nice things about making a functional art piece is that if the gift receiver doesn't feel like putting it on their wall they can put it in their closet without feeling guilty. It doesn't take up a lot of room and it serves a very practical purpose. Also, it's fairly inexpensive if you already have the jigsaw, drill and paint.

First I went online to find a lovely lady. My requisites for the photo were: front facing, preferably with neck and shoulders exposed; hair that looked manageable from a sawing perspective; and a certain makeup style that included lots of dark eye shadow. I would have preferred to have an anonymous person, not a movie star - but because of time limitations, I figured an actress would be easier to find. I settled with a lesser known star, someone that I had never heard of: Anita Page. There are great photos to choose from here and here.

After I chose my photo I printed out a hanger-sized black and white copy to use as a template. It took several pieces of 8 1/2 x 11 inch paper taped together to get the whole image at the right size. Sizing was trial by error - I just kept trying until I got it right. I wanted it to be life size, so that it would look right with clothes hanging from it. I cut the template into a shape that I thought looked nice and would be functional.

Hanger Template
Originally uploaded by Green Kitchen.

I traced the outline of the template onto a piece of high-quality plywood (smooth, no knots). With a jigsaw, and some ear protection on, I cut the basic shape for the hanger trying not to leave too many bumps that would have to be sanded later. My three-year-old son and I sanded the edges together by hand. I figured perfect sanding (i.e. with the grain) wasn't too important because I was going to be priming the wood white and then painting over it.

Hanger Template Back
Originally uploaded by Green Kitchen.

To transfer the image from the template to the wood I used a pencil and marked up the back of the template since I didn't have any carbon transfer paper. Placing the template onto the wood I outlined the basic features, hairline and shading. I didn't get a photo of this stage of my project, but here is the same stage for a similar hanger project.

Template Transfer
Originally uploaded by Green Kitchen.

With a color print out of the hand-tinted photo I went to work painting the hanger. I used acrylic paints, which dried a little too fast for my liking - but since I'm pregnant and working on the kitchen table it worked well enough. Her skin blending is a little more splotchy than I'd prefer. I did three sessions of painting and ended with a wash of transparent yellowish brown to give it a more aged look, rubbing some of it away so that it wasn't too thick. I painted the edges and the back black, letting some of it come over to the front of the hanger. If I wasn't pregnant I would have finished the painting with a thick varnish on the edges and back to give the clothes a more slippery surface for sliding onto.


Anita Page Portrait
Originally uploaded by Green Kitchen.

Finding the hook-shaped hardware to turn it into a hanger was challenging. I looked online for sources, but there didn't seem to be any. Sundee's dad, who was also working on a similar project to hang a knitted shawl from, found a great solution. He looked at various wooden hangers until he found the type that the hook is just screwed in - just unscrew it and you have your hardware. Since you are sacrificing a perfectly good hanger, it's nice to find them cheap at a $1 Store or garage sale - I found mine in my closet. Using a drill bit that is slightly smaller than the diameter of the hook I, then, drilled a hole in the top of the hanger. Screw in the hook and you're done.

An alternative version, and a bit easier, would be to get a full-sized color print out and decoupage it to the wood - no painting! One of my next projects is going to be a children's hanger to display a vintage polka-dot bathing suit.

Labels: , , ,

Tuesday, January 24, 2006

Mushroom Motif


mushroom_sky
Originally uploaded by Green Kitchen.
For those of you who are enamored, as I am, with the magical red and white spotted mushroom (a.k.a. Amanita muscaria or Fly Agaric), I've put together a list of art and crafts that features this beautiful fugus. This mushroom is the premiere fairy tale mushroom, gnomes and hookah smoking caterpillars often sit on them; I've seen Petite Blythe wearing one. It is said to make Santa's reindeer fly, and some say it is linked to the beginning of Christianity. It definitely has magical properties, as well as excellent design elements—maybe that's why we like it so much. Mushroom toys, Christmas ornaments, and children's book illustrations are lists unto themselves—perhaps a future project.

—Mushroom Art: Art Installation, Roman Graffiti, NYC graffiti, Sand Sculpture
—Mushroom Clothing: Skirts & Aprons by Made With Love by Hannah, and Applique T-shirt by Cupcakesorbet
—Mushroom Fabric: Japanese, Heather Ross, Vintage
—Mushrooms Crocheted by: Angharad, Oh Sew Pretty, Comfits & ElizabethD
—Mushrooms Felted by: Wol&Zo
—Mushroom Cozies by: Ask Anke (you'll have to scroll down for this one) & Axelhoney
—Mushroom Quilt by: 3j0hn
—Mushroom Pincushion by: Wataame
—Mushroom People by: Axel Honey
—Mushroom Softie by: Laureski Kolaure
—Mushroom Handbag by: Laureski Kolaure
—Mushroom Brooches by: My Little Odd Forest
—Mushroom Hat by: Dina Ladina


amanitamuscaria1
Originally uploaded by Green Kitchen.

Labels: ,

Wednesday, January 18, 2006

Amigurumi with Flowers


Amigurumi with Flowers
Originally uploaded by Green Kitchen.
This is my first attempt at amigurumi. I started it last summer and am happy to have finally finished it--seems this blog gives me a little extra incentive to get things done, which is exactly what I need. For the longest time this gal had no arms or legs because each time I crocheted some they looked like tampons or tampon cozies as it were.

Labels: , , ,

Monday, January 16, 2006

Crocheted Flower Scarf


Crocheted Flower Scarf
Originally uploaded by Green Kitchen.
I crocheted this scarf after seeing it posted on needle book. Thank you Claire for taking the time to post the instructions. I was suprised at how, when wrapped around the neck, it looks like a choker. It's definitely more delicate and feminine than your average scarf.

Now, about the original scarf costing $10 (This is not a criticism to you, Claire, I would have bought the scarf, too). This scarf took me a week of evenings to produce. What poor soul got paid pennies for that much work? Making our own crafts and clothes, as well as, growing our own food are important ways reconnect with how much effort "handmade" takes and to be reminded of the true costs of the cheap import or the cheap pesticide-laden food. Something or someone suffers when things are under priced/under valued. Buying locally or paying "fair trade" prices is another good way to stay connected to the real costs.

Labels:

Apple Pocket -- Ringo-No-Poketto

I made this apple "pocket" from a Japanese (English language) craft book: Kokoro no Te by Kumiko Sudo. It's two halves, felt lined and sewn together, with an opening at the top so you can tuck a little treasure inside. Put a long cord on it and it would make a cute purse just big enough to hold a driver's license and a key. It's completely handsewn and took me about a day, off an on, to finish.

I'm anxiously waiting to see if I'll be making the trek to the nearest Japanese book store today with a friend. It will be my first adventures into the big world of Japanese language craft books. I'm continually amazed at the images that the crafty bloggers have been posting from them, and can't wait to get my hands on some. I've made my fair share of kanzashi, have dabbled in amigurumi, and have just started sewing again. So, I'm excited to see what I come home with. What's budget should I allow myself? Luckily my three-year-old will keep me in check, since he'll only give me some minutes before running round and round the aisles.


Apple Pocket Detail
Originally uploaded by Green Kitchen.


Labels: , ,

Friday, January 13, 2006

Fungus and Fabric


After two weeks of flu my son and I escaped the black hole that is our home and had great adventures in town and outdoors. We foraged for fabric and fungus and were successful with both--thrift store solids and small prints ($6US); and a couple handfuls of perfect chanterelles (free)! Exercise, dinner, and future crafts/clothing all for under ten bucks.

Labels: , , ,

Thursday, January 05, 2006

Hello Craft Bloggers!


Sad Snowman

Sad Xmas Tree
Dead Santa

After many months of lurking in the crafty blog world I've decided to start my own, which is proving to be bit challenging on my outdated Mac OS system. But the allure of the craft community is stronger than my I-don't-want-to-upgrade-my-system laziness. I want to thank all you crafty bloggers for giving me entertainment, inspiration, and an overall energy boost--each very necessary for me after my 2005 crafting rollercoaster.

2005 was a very crafty year for me. My child was old enough to allow me some craft opportunities, as well as enough time to co-host an alterna-craft fair called ¡CRAFTALICIOUS! The fair was great--we had over 50 vendors, over 1200 attendees, and a full-page color article in the local newspaper. The only real complaint was that it was crowded and sweaty. I made new crafty friends--I felt like I had found my people. But nobody warned me of post-show letdown. Actually, Leah, from Craftster, who had been generously answering my questions, told me that after her first Bazaar Bizarre show she couldn't even say the BazBiz words for months . At the time I didn't understand; I was riding the high of manic anticipation. But, after the show, I went through several months of craft depression. I was directionless. I only had the energy to do some silly felt portraits of gender-bending saints. Everyone was asking when the next show would be, but it didn't seem right to consider embarking again on a project where two people worked full time on a craft fair for five months, neither financially wise nor fair to the craft widows and orphans the time commitment had created. So, after wallowing in my depression for awhile, my crafting co-hort Meghan and I decided to apply for a local craft fair only to be denied by a committee that liked mohair teddy bears better than our 
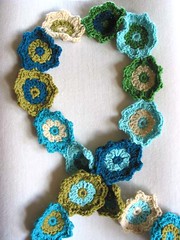
kanzashi and George Bush toilet paper cozies. Luckily the rejection did not set off another bout of depression; I couldn't really get with the teddy bears, so why would I think they could get with our stuff. To each their own craft fair.

Enter the crafty and arty blog world. I fell in love with it as soon as I googled for a children's pants tutorial and found Red Current: a stay-at-home mom who admits to letting her children watch videos so that she can find time to craft. She only cleans for 20 minutes a day. Her photos are beautiful. What's not to love. I've made six pairs of pants based on her tutorial. From there I went to Angry Chicken and was immediately impressed with her 
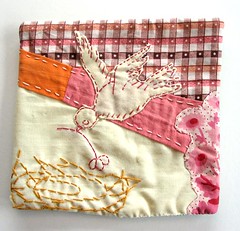
small quilts. I was inspired to make a few for Christmas presents, but enjoy hers more. After seeing Susie's little paintings I did a 12 Days of Christmas series and was in my first art show since college. Recently I bought Jess' book and am excitedly anticipating learning to knit on double-pointeds. And, today I bought Camilla's calendar, which brings me up to date, literally and figuratively. I'm looking forward to posting more photos of things I make and hope to be an active part of this crafty community. Thanks again for everything.

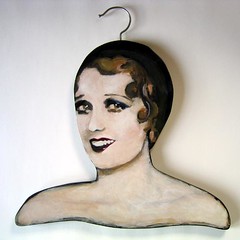
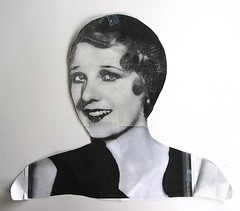
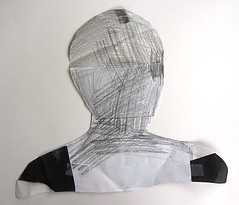
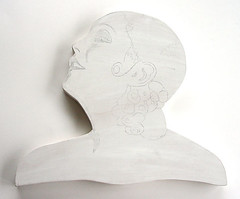
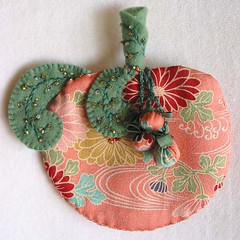
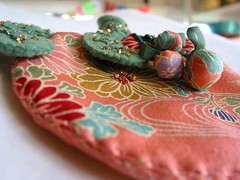
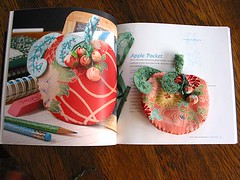
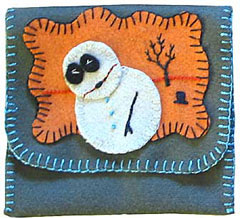
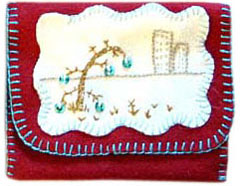
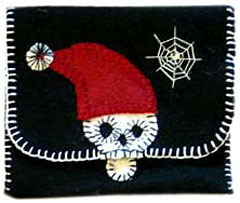
The photos above are of a Dreary Xmas wallet series I did last winter. Somehow sad Christmas makes me happy.

Labels: , ,