Cool Yule: A Holiday Tutorial
DISCLAIMER: This project involves melting paraffin, which can be dangerous on several levels. Please read all the instructions and safety links, then proceed with caution (i.e. do use proper ventilation; do use a double boiler instead of direct heat; don't stick your hand in the wax when it's still very hot; don't leave the wax on the stove unattended, etc.). This is NOT a craft for children. Please read the paraffin box and/or online for safety precautions. I used paraffin because it's what I had at home. Here's the Materials Safety Data Sheet for paraffin. Seems less benign than what the soy folk report, but it does seem like a good idea to stick with a non-petroleum-based wax if you can. Here's someone who reports to have a neutral view on the Soy vs. Paraffin debate. In the end, I'll let you decide which wax is right for you. Now, let's talk about Christmas, or Yule as it were.
 I saw a cute, kid-friendly Yule* log from The Toby Show, via The Crafty Crow that reminded me of the ones that we used to make many years ago. This is a simple and inexpensive craft that makes a beautiful center piece, hearth decoration, or holiday gift. People really seem to like receiving them. The best part is that the recipient gets to enjoy a cozy, Yule fire when they are tired of having it around — a consumable gift with no caloric intake!
 Step 1: Gather the Materials (clippers, log & nature bits, paraffin, and two craft-only cooking pots)
Go for a walk in the woods with a pair of clippers — or, perhaps your street or backyard — and collect bits of nature. Moss, lichen, acorns, pine cones, holly and some tree branches are the kind of things you'll be looking for. At home, melt the paraffin (I used a whole box, but had about half left over) in a designated craft-only cooking pot or can that is placed within another pot that has water in it (not directly on the heat source) — or a double boiler — following the safety precautions on the box of paraffin. Protect your work surface with newspaper or tarp. It's best to do the assembly outside.
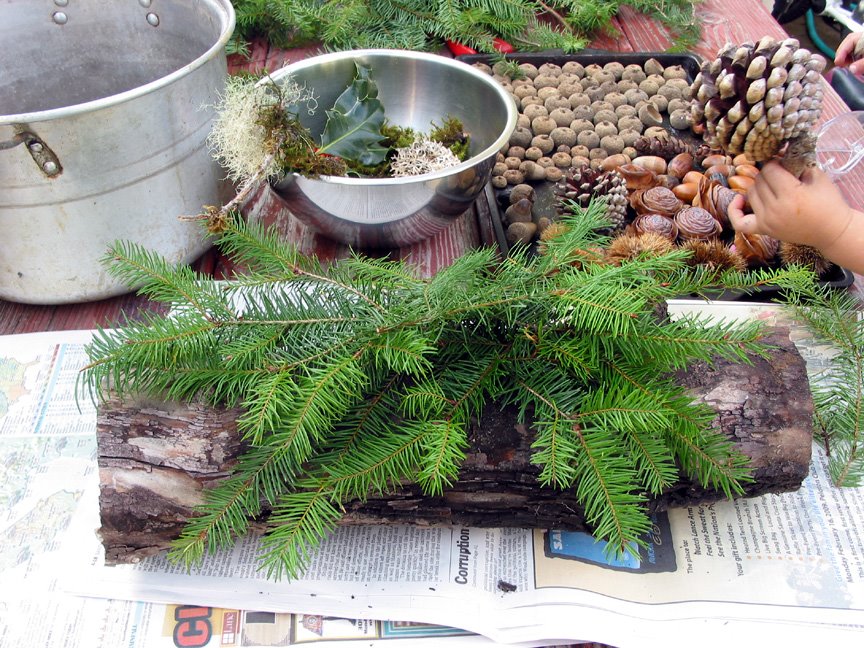
 Step 2: Rough Draft
Lay out the tree branches that will be the base of your decorations on the log. I used Douglas Fir clippings from our Christmas tree. Fan them out to the left and right so the stems get buried in the "snow" that will anchor them to the middle of the log.
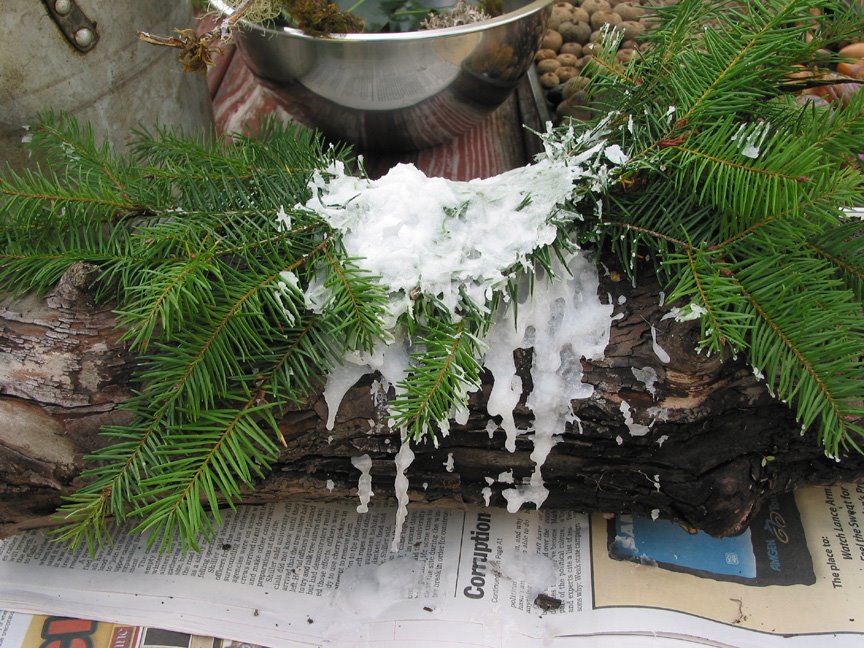
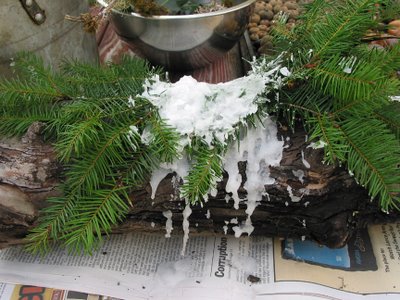 Step 3: First Snow
The most complicated thing about this project is getting the wax to be the right temperature and consistency. When it starts to cool it will develop a skin on the surface. This is about the right time to start testing to see if it's cool enough to touch and hold some of its shape. I use my fingers to scoop the not-too-hot-but-still-malleable wax. Put a clump of it under the branches in the center of the log, then press the branches into it and added more to the top. Holding it in place as it cools helps cement it to the log. If things don't stick just add more wax — it conveniently looks like snow. Many happy mistakes can happen on this project.
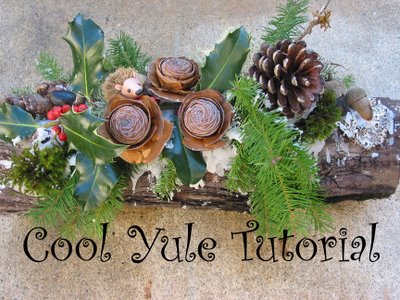
Step 4: Lay Out Your Design and Secure
Lay out your various woodland bits in a pleasing manner. Odd numbers look better sometimes. You can see I put one big pine cone and three of the cedar rosettes. Rearrange until you are happy and then use more wax to secure each piece. Your pot of wax will probably have hardened by this time, so you'll need to reheat it. It doesn't take long to reheat, maybe thirty seconds to a minute. Always attend the wax when it's on the stove. It can catch on fire!
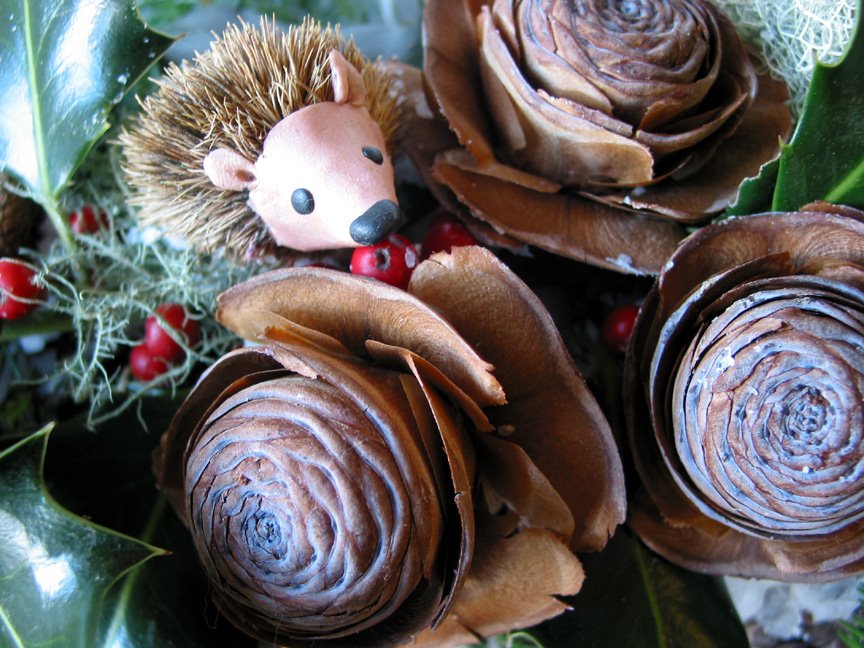
 Step 5: Embellishment
You can stop at Step 4 with great success, but if you want to make it even more woodland-y cute, you can make little critters to live on your log. I made this hedgehog with a seed pod (not sure what kind) and some Fimo.** I didn't heat set the Fimo because it would just cook/crack the pod — I'm treating it as a short-term craft since it's the nature of these pods to open up and release their seed. I also want to make some logs with mushrooms, of course. I'd still love to make a Bûche de Noël someday, but until the kids are bigger this is as close as I get.
* The Toby Show post has info and links about Yule.
**My gifts will have a tag that recommends removing the Fimo pieces before burning, because I don't think it would be good to breathe the fumes.
 I saw a cute, kid-friendly Yule* log from The Toby Show, via The Crafty Crow that reminded me of the ones that we used to make many years ago. This is a simple and inexpensive craft that makes a beautiful center piece, hearth decoration, or holiday gift. People really seem to like receiving them. The best part is that the recipient gets to enjoy a cozy, Yule fire when they are tired of having it around — a consumable gift with no caloric intake!
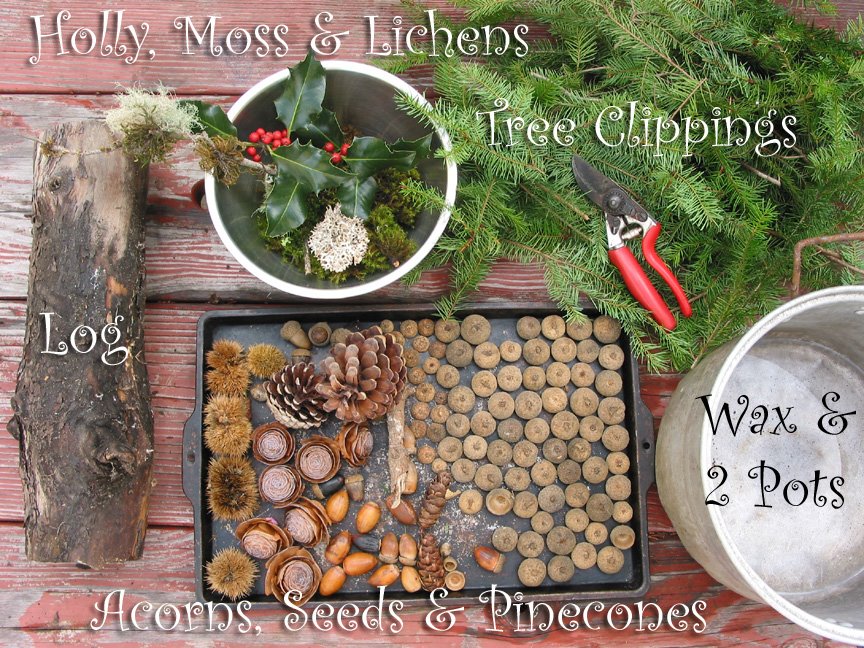 Step 1: Gather the Materials (clippers, log & nature bits, paraffin, and two craft-only cooking pots)
Go for a walk in the woods with a pair of clippers — or, perhaps your street or backyard — and collect bits of nature. Moss, lichen, acorns, pine cones, holly and some tree branches are the kind of things you'll be looking for. At home, melt the paraffin (I used a whole box, but had about half left over) in a designated craft-only cooking pot or can that is placed within another pot that has water in it (not directly on the heat source) — or a double boiler — following the safety precautions on the box of paraffin. Protect your work surface with newspaper or tarp. It's best to do the assembly outside.
 Step 2: Rough Draft
Lay out the tree branches that will be the base of your decorations on the log. I used Douglas Fir clippings from our Christmas tree. Fan them out to the left and right so the stems get buried in the "snow" that will anchor them to the middle of the log.
 Step 3: First Snow
The most complicated thing about this project is getting the wax to be the right temperature and consistency. When it starts to cool it will develop a skin on the surface. This is about the right time to start testing to see if it's cool enough to touch and hold some of its shape. I use my fingers to scoop the not-too-hot-but-still-malleable wax. Put a clump of it under the branches in the center of the log, then press the branches into it and added more to the top. Holding it in place as it cools helps cement it to the log. If things don't stick just add more wax — it conveniently looks like snow. Many happy mistakes can happen on this project.
Step 4: Lay Out Your Design and SecureLay out your various woodland bits in a pleasing manner. Odd numbers look better sometimes. You can see I put one big pine cone and three of the cedar rosettes. Rearrange until you are happy and then use more wax to secure each piece. Your pot of wax will probably have hardened by this time, so you'll need to reheat it. It doesn't take long to reheat, maybe thirty seconds to a minute. Always attend the wax when it's on the stove. It can catch on fire!
 Step 5: Embellishment
You can stop at Step 4 with great success, but if you want to make it even more woodland-y cute, you can make little critters to live on your log. I made this hedgehog with a seed pod (not sure what kind) and some Fimo.** I didn't heat set the Fimo because it would just cook/crack the pod — I'm treating it as a short-term craft since it's the nature of these pods to open up and release their seed. I also want to make some logs with mushrooms, of course. I'd still love to make a Bûche de Noël someday, but until the kids are bigger this is as close as I get.
* The Toby Show post has info and links about Yule.
**My gifts will have a tag that recommends removing the Fimo pieces before burning, because I don't think it would be good to breathe the fumes.