Related Posts Widget for Blogs by LinkWithin

Thursday, February 14, 2008

A Tasha Tudor Valentine

valentine
This is a valentine card I made for my mom about twenty years ago. The idea and instructions came from the wonderful, but, sadly not-in-print book Drawn From New England, by Bethany Tudor. She's the daughter of children's book author/illustrator Tasha Tudor — who's about 93 by the way! Each flower or tree can be pulled out of its pot where a hidden Valentine message waits.

I used to spend a lot of time with this book dreaming about all the crafts, seasonal celebrations, and old-fashioned farm lifestyle this creative family experienced. Now that I have children I'm even more amazed at the life that Tasha made for herself and her family. If only I could accomplished a fifth of what she did/does...

Read more about the Tudor Family at their website, where you can also buy things directly from them, including Bethany's book.

Labels: , , , ,

Friday, January 11, 2008

Big, Bad Wolves

Senorita Capasita Roja
Thank you for all the mama support in my last post. Wouldn't it be lovely if we could all find the same in our local communities?

With my remaining half brain cell that is still functioning, I've been attempting to have some Deep Thoughts (tm). You know — the who am I? what am I doing? kind of stuff. Plus, I'm revisiting why I'm not so nice to people sometimes. You don't see a lot of the Mean Michelle here. But, if you were my sister — woo boy — you would have lived it. If you were some young girl wearing the wrong clothes and drawing the wrong thing in high school art class, you probably got an earful, too. What is wrong with my brain/self that would have me do such things? The pathetic thing is that I still have that big bad wolf in me. Get close enough and I *will* bite you at some point.

Then, today, a friend sent a link about a possible/probable design theft. That kind of stuff really makes me want to bite someone.

Speaking of teeth: Has anyone had a young child put under full sedation for dental work? My little guy has three cavities, older bro has none. It's not as bad as some things, but I still feel like a horrible parent. Maybe I passed on weak DNA, or didn't brush enough, or nursed on demand, or shared my nasty mouth flora. And, now, I'll have to put him in what seems like a dangerous situation because of it. [insert mama wolf growl here]

And, while I'm at it: would someone, please, turn up the daylight hours or fast forward to spring? Remember the what-does-your-calendar-year-look-like idea? Well, mine is a vertical format with January at the top — pretty standard stuff — but, for me, winter is over after New Year's eve. January 1st should be the first day of spring. And, on my calendar the seasons are not created equal. Spring, summer, and fall can split up eleven months as they wish, but old man winter only gets December.

Labels: , , ,

Tuesday, December 04, 2007

In the shop: Miniature Dog Paintings

Miniature Dog Paintings
These little guys are miniature (2 x 3 inches) acrylic paintings that I did a couple years ago. They spent one holiday season as decorations on our feed store's Christmas tree. Other than that they've been in storage waiting for their forever-home. You can find them over here.

Labels: , , , ,

Wednesday, May 30, 2007

Teacher Gift


teacher_gift
Originally uploaded by Green Kitchen.
Worked from 11pm to 1am late last night on this spread from an end-of-year memory book for my son's pre-school teacher. I've used this technique for several gifts and have enjoyed it every time. I choose photos, size them in Photoshop, print and cut them out, and draw/paint a background for them. It's really fun and relatively quick. It makes for an inexpensive gift, which can be quite nice when you have lots of parties to go to. Remember the first one that I did? I also did one of a brother and sister in a boat, sailing the skies as pirates. I heavily "borrowed" the ship design from a fellow blogger, which is why I've never shown it here. My excuse was lack of time. I needed a cool boat and I needed it THEN. I figure it's ok if I'm not selling it, right? Sheepish crafty secrets revealed.

Labels: , ,

Tuesday, May 29, 2007

Bedroom Wall


wall
Originally uploaded by Green Kitchen.
I've been busy sewing curtains for our little cabin in the woods. I'm gathering up a bunch of photos from my sister to do a WIP post about it soon. This photo is of our current bedroom wall. It's a typical example of how I don't finish projects around the house. Hopefully this won't be true up at the cabin. This wall has been like this for several months. Seems like it will be awhile before I get everything framed. I have a couple other pieces I'd like to add. Click on the photo to get to flickr where I've added notes on all the pieces.

Labels: , , , ,

Monday, March 26, 2007

Self Portrait


Self Portrait
Originally uploaded by Green Kitchen.
How did I know, half my life ago, that this is how I would look and feel today as a mother of two small children each getting over a cold and one of them teething. I'm feeling lonely today, so Bitter Betty's coming down to save me. I know I'm not alone in this weird, isolated job that they call motherhood.

Labels: ,

Tuesday, October 31, 2006

Day of the Dead Couple


Day of the Dead Couple
Originally uploaded by Green Kitchen.
Una señora y un señor for a Día de los Muertos group show I was in last year. It was my first show since college, 16 years ago! They are small, about 4 x 6 inches, acrylic with buttons and string.

Labels: ,

Thursday, September 28, 2006

Art for Dolls


mom_child_actualsize
Originally uploaded by Green Kitchen.


girl_chicks_actualsize
Originally uploaded by Green Kitchen.


rose_still_life_actualsize
Originally uploaded by Green Kitchen.


lighthouse_actualsize
Originally uploaded by Green Kitchen.
Ulla and many others (I'm too tired to look up URLs right now, so if you have a dollhouse post, leave a comment with a link so we can go visiting.) have been posting about dollhouses in the last couple months, which got me thinking about these paintings I did for my mom's dollhouse many years ago. If I remember correctly, the top three are copies of some vintage prints we had around the house. If anyone knows who the artists are I'll give credit where credit is due. I think I used gouache. The tiny frames came from a miniature store, some are wood and some are metal. These are the actual size of the paintings. See my Flickr for enlarged (or, enhugened, as Blaize would say) versions of these tiny paintings.

Labels: , ,

Saturday, January 28, 2006

Vintage Lady Hanger Tutorial


Vintage Lady Hanger
Originally uploaded by Green Kitchen.
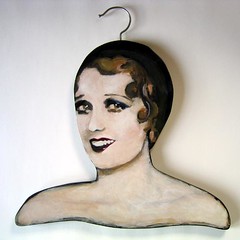
This silent movie star hanger was my favorite holiday project that I made last year. It was inspired by a vintage hanger that my friend, Sundee, used to have when we were housemates. Her hanger lady was dark, moody and had a beautiful sixty-year patina. We hung her on the wall and she looked lovely. Somewhere along the way, after several cross-Atlantic movings, the original hanger lady got lost. I'll try to find a photo of her to post later.

One of the nice things about making a functional art piece is that if the gift receiver doesn't feel like putting it on their wall they can put it in their closet without feeling guilty. It doesn't take up a lot of room and it serves a very practical purpose. Also, it's fairly inexpensive if you already have the jigsaw, drill and paint.

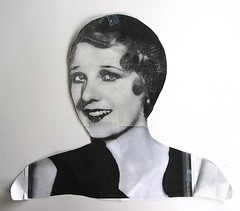
First I went online to find a lovely lady. My requisites for the photo were: front facing, preferably with neck and shoulders exposed; hair that looked manageable from a sawing perspective; and a certain makeup style that included lots of dark eye shadow. I would have preferred to have an anonymous person, not a movie star - but because of time limitations, I figured an actress would be easier to find. I settled with a lesser known star, someone that I had never heard of: Anita Page. There are great photos to choose from here and here.

After I chose my photo I printed out a hanger-sized black and white copy to use as a template. It took several pieces of 8 1/2 x 11 inch paper taped together to get the whole image at the right size. Sizing was trial by error - I just kept trying until I got it right. I wanted it to be life size, so that it would look right with clothes hanging from it. I cut the template into a shape that I thought looked nice and would be functional.

Hanger Template
Originally uploaded by Green Kitchen.

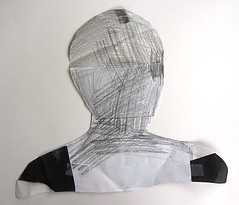
I traced the outline of the template onto a piece of high-quality plywood (smooth, no knots). With a jigsaw, and some ear protection on, I cut the basic shape for the hanger trying not to leave too many bumps that would have to be sanded later. My three-year-old son and I sanded the edges together by hand. I figured perfect sanding (i.e. with the grain) wasn't too important because I was going to be priming the wood white and then painting over it.

Hanger Template Back
Originally uploaded by Green Kitchen.

To transfer the image from the template to the wood I used a pencil and marked up the back of the template since I didn't have any carbon transfer paper. Placing the template onto the wood I outlined the basic features, hairline and shading. I didn't get a photo of this stage of my project, but here is the same stage for a similar hanger project.

Template Transfer
Originally uploaded by Green Kitchen.

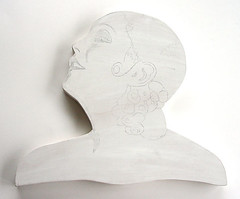
With a color print out of the hand-tinted photo I went to work painting the hanger. I used acrylic paints, which dried a little too fast for my liking - but since I'm pregnant and working on the kitchen table it worked well enough. Her skin blending is a little more splotchy than I'd prefer. I did three sessions of painting and ended with a wash of transparent yellowish brown to give it a more aged look, rubbing some of it away so that it wasn't too thick. I painted the edges and the back black, letting some of it come over to the front of the hanger. If I wasn't pregnant I would have finished the painting with a thick varnish on the edges and back to give the clothes a more slippery surface for sliding onto.


Anita Page Portrait
Originally uploaded by Green Kitchen.

Finding the hook-shaped hardware to turn it into a hanger was challenging. I looked online for sources, but there didn't seem to be any. Sundee's dad, who was also working on a similar project to hang a knitted shawl from, found a great solution. He looked at various wooden hangers until he found the type that the hook is just screwed in - just unscrew it and you have your hardware. Since you are sacrificing a perfectly good hanger, it's nice to find them cheap at a $1 Store or garage sale - I found mine in my closet. Using a drill bit that is slightly smaller than the diameter of the hook I, then, drilled a hole in the top of the hanger. Screw in the hook and you're done.

An alternative version, and a bit easier, would be to get a full-sized color print out and decoupage it to the wood - no painting! One of my next projects is going to be a children's hanger to display a vintage polka-dot bathing suit.

Labels: , , ,