
Wrist Pincushion Tutorial and Give-away

I have listened to all your suggestions about how to make Green Kitchen a more fun and exciting crafty place to be, and I have decided that more tutorials = a better craft blog (good for you). Also, more tutorials = a boost to my viewership and technorati rankings at the same time (good for me).
-------------------
WRIST PINCUSHION TUTORIAL
Materials:
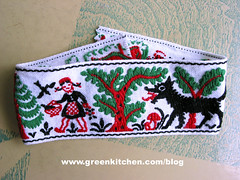
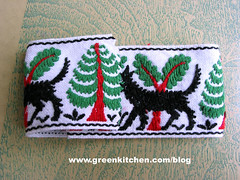
Embroidered Ribbon (a piece about 2 x 10 inches)
Embroidery Floss (in a complementary color)
Cardboard (I used a piece from an old seam binding package)
1/2 Inch Elastic (long enough to go around your wrist, plus a couple inches)
Stuffing (I used polyfil, but I'm sure wool would be great.)
Heavy Duty Thread (for attaching the elastic to the pincushion, I used Coats & Clark's button thread)
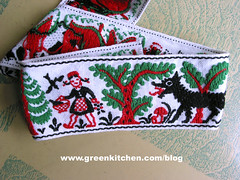
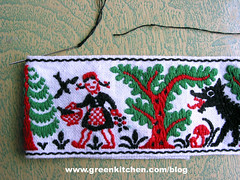
Step 1: Choose your ribbon. It needs to be at least a couple inches wide.
Step 2: Using pinking shears, cut the ribbon to size — about ten inches long.
Step 3: Fold the ribbon over on the back side. You'll want a bigger, stuffing end and a shorter, flap closure end.
Step 4: Prepare your thread. I used two strands of embroidery floss.
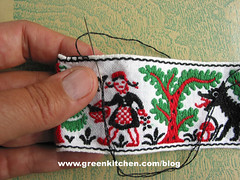
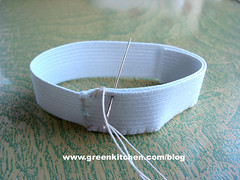
Step 5: Starting at the bottom corner of the bigger end, put the needle from the inside to the outside of one of the corners. This is the beginning of the blanket stitch.

Step 6: Blanket stitch along the long end. Working from front to back, put the needle through both layers of ribbon starting about 1/8 inch away from the corner, while making sure to keep the end of the thread behind the needle. Pull thread tight, but not so tight that it starts to bunch up the ribbon. If you need more instruction: Alice at futuregirl has a nice blanket stitch tutorial here.
Step 7: Continue to blanket stitch, keeping stitches 1/8 inch apart, up the one side to where the doubled up ribbon ends. Tie off and cut, leaving enough thread to tuck in later.
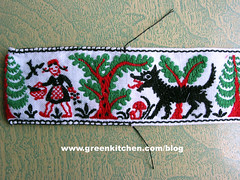
Step 8: Do the same on the other side. Tie off thread, again leaving enough to tuck in later.

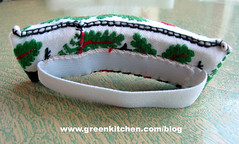
Step 9: To make sure you don't poke pins through the pincushion and into your wrist, you'll need to make some wrist protection. Cut a piece of thin cardboard to fit inside the sewn ribbon, making sure the flap still has enough room to have its end turned in and sewn close.
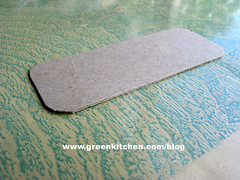
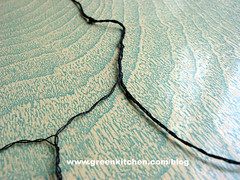
Step 10: Cut radiused corners on the cardboard, so it doesn't poke through the ribbon.
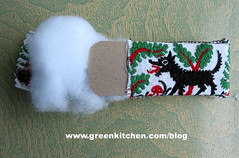
Step 11: With the cardboard inside the ribbon, start stuffing the pincushion. The cardboard should be on the bottom side of the pincushion, the stuffing on the top side.
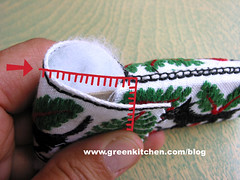
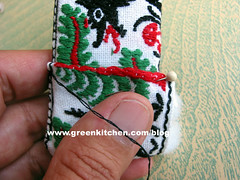
Step 12: Fold over the ribbon making sure there is enough to hem and overlap. If there isn't enough, you can trim the cardboard. The red lines show how the closing stitches are going to be worked.
Step 13: Starting at the top corner, work a blanket stitch down toward the closure, stopping before the end of the ribbon to make room for the finished edge.
Step 14: After folding in the ribbon end, continue the blanket stitch to the end.
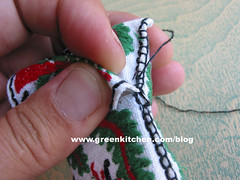
Step 15: Before working across the flap, it helps to put in a pin to hold the ribbon from pulling away.
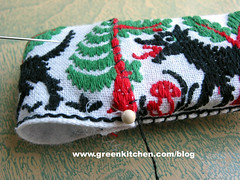
Step 16: Because it's a little easier, and won't be seen, whip stitch across to the other side. Leave the thread attached. Now, make sure the stuffing is as you want. You might need to rearrange it and add a couple pinches. If you need more instruction: Alice at Futuregirl also has a nice whip stitch tutorial here.
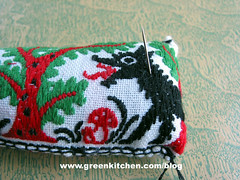
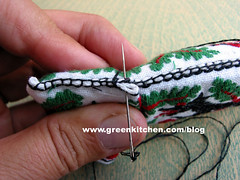
Step 17: Finish up the seam by blanket stitching to the end. Tie off thread and work in the end by poking the needle back through the pincushion, pulling the thread tight, and cutting the thread.
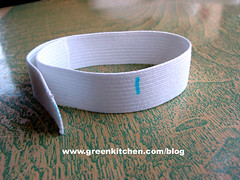
Step 18: Measure your elastic. Wrap the elastic around your wrist, making sure there is an overlap of an inch or two. Mark where the overlap ends.
Step 19: Using a strong thread, like button thread, blanket or whip stitch the elastic together along the edges. Try on for size. You want it tight enough so it doesn't slip around, but loose enough to be comfortable.
Step 20: Hiding the thread knot and end between the elastic and the pincushion, whip stitch the elastic onto the pincushion.
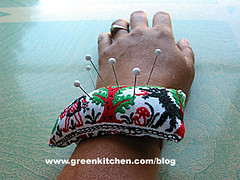
Step 21: Try on the finished pincushion and make slight adjustments for comfort by carefully bending the cardboard to fit the wrist.
Enjoy!
Labels: giveaway, pincushion, sewing, tutorial


48 Comments:
I am loving this idea! I have some lovely vintage embriodered trim, sitting in my sewing desk drawer...aching to be used for something! Now I know What!!!YAY!~!
and the giveaway, well that is just gravy! I added the link to my blog so please add me to the gravy bowl, will you please!
Love the ribbon you've used. Please count me in! I've written about your blog and the giveaway on my blog at http://myhalfofthebrain.com/2008/08/24/wrist-pincushion-tutorial-and-giveaway/
Crossing my fingers for luck!
What a great idea! I've posted a link back on my giveaways page on my blog. This is a fun tutorial, and although I hate stitching by hand, it doesn't look that difficult and I think I could actually make this!
this is really a cute pincushion and a nice, clear tutorial! check out my blog link about it. http://lagniappe-suesueb.blogspot.com/
that ribbon is fabulous!
claire
Excellent tutorial Ms. M. I love that ribbon and the cardboard protection is simply brilliant.
The fabric is munchy munchy awesome. And the tutorial is excellent.
Oh, and looky looky! I did a thing: http://stblaize.blogspot.com/2008/08/youve-got-friends.html
I'm new to your blog. The pin cushion is adorable and the giveaway sounds like fun. Am linking to my blog now...
oh how I do love the material(ribbon) you used...so nice :o)
looks like I'm not the only one :o)
~simply~
I love this. I just started long arm quilting and its either wear a tool belt to hold my tomato or make this wrist pincushion---I think I'm making the pincushion!
can i just say you are brilliant! so great!
Fabulous tute - that ribbon is super good! All linked at my end!
Hi love your tut, clear as water and count me in. I posted about it on my blog at http://nathaliebrault.blogspot.com
Thanks for the chance to win this lovely wrist pincushion.
I love the ribbon you used too! You can count me in! http://insidemysewingbox.blogspot.com :)
I loved the ribbon you choose. Your tutorial and giveaway is at my "Links' Tuesday" post.
This is so cute- I'm posting a link at my new blog :)
Great ribbon and a very clear tutorial.
WOW, what a well done tutorial! I am totally linking to this. Not to mention adding you so I don't miss a thing!
I wrote a post about your tutorial--I hope I win it, but if I don't, I'll make one!
What a great idea. I linked your tutorial on my blog and I also added your blog to my "daily dose of inspiration" list. I'm over at www.seamsoflife.typepad.com.
I might not be much help in the viewership department because I'm a new blogger and don't have many readers myself. But every little bit helps and I read your blog everyday and love it.
I just posted my link to your tutorial! :)
I have been loving your red riding hood ribbon since you first posted about it...I linked!
i love this! i just posted this tutorial/giveaway on my blog. yeah.
enter me please. and thank you.
this tutorial is AWESOME!
i have a wee post backlog at the old blog, so I don't deserve to be entered in the giveaway with all the quick posters. but I *will* be both making this and posting about it soonest- will e-mail you when I do!
wow! I've just found your blog - so many lovely things!
thanks for this great tutorial - I have some braid that will work perfectly I think!
I will post about your fab blog on mine: http://charlieandgrace.blogspot.com/
Count me in to your comp!
Ali :)
You have hands down achieved that craft serendipity of perfect pairing of material with object. The ribbon was amazing to start with, you've only heightened it's beauty.
such a great idea! thanks for the detailed tutorial.
I really think I could make this. Thanks for the tutorial! I've linked to it on my blog. http://pipstitch.blogspot.com/2008/08/giveaway-from-green-kitchen.html
Great tutorial!! I'm linkin' you up in my sidebar.
Can't wait to try this. Gotta get some cool ribbon.
Oh I would love to be a part of this great give a way!
I'm linking!!!
I need ribbon like that or I may perish.
Great tutorial Michelle! That ribbon is adorable and it's a perfect way to use that little bit of ribbon that you can't bear to part with :) Include me in the giveaway please!
This is such a fantastic idea! I love the way you've used ribbon - I'm sure so many have small pieces of vintage wide ribbon that we just don't know else to do with!
Thank you for sharing the tutorial.
Count me in as well!!! The pincushion is to die for cute! I have linked to the tutorial and 'told' all of my friends!!!
I love that ribbon. I will link to you, but am I too late, doesn't really matter. Thanks for the tutorial!
Ooh ooh ooh! Count me in please - I do love this idea. There's something in the colours of that ribbon I find really appealing.
I just added a link from my blog to this tute: http://august-street.blogspot.com/2008/09/spring-in-green-kitchen.html
I linked it too!!!
What a great idea; thanks for the tutorial
sweet! now if I could just find some of that red riding hood ribbon! dang!
thanks for the tutorial. I have been wanting to make something similar and this has spured me to do it.
cute! I'd love to win!
Hi,
I just found your blog today and linking your tutorial to my blog.
Great tutoral!
Hi,
Also the link to my blog is
http://craftybeartreasures.blogspot.com/
Well, unfortunately, I just found this tute! Well, fortunately, too, cause I am going to make it RIGHT away! I just love it! Your instructions and photos are so perfect and so easy to understand! Thank you so much! Paula
Great pincushion tutorial! Thank you! I'm a very new blog. Don't have much posted yet, but I'm hoping that will change soon. ;D I posted a link to you on my site.
Simple and sweet!
Thank-you!
Lynn
Unique and nice idea here...I quite like it and am going to try my hands over it.
Post a Comment
Links to this post:
Create a Link
<< Home